Showing posts with label DIY. Show all posts

Wednesday, May 15, 2013

DIY Apothecary Jar: not for the OCD

What does that basket even say?  I don't know, but I must have it.
Before I begin, I must admit I have a soft spot in my heart for vintage products with writing on them.  A plain basket?  Eh.  A basket that has faded paint spelling out "Boothbay Harbor Oysters, 1875"?  Oh my God I want it.  I don't really know the psychology behind it, I guess once there's a story on it, it just becomes a mystery how this basket wound up in front of me, waiting for me to adopt it. Also, there is a > potential for ghosts.  I was lucky enough to nab this vintage marble apothecary jar at an antique shop, however, all the writing had faded off and the only part left was the chipped gold rim.
At least I think it is marble.  It's probably marble right?
I was a bit bummed it didn't have remnants of "Ess. of En.Daffo: fils" or some other incomprehensible writing for a remedy that probably was relatively ineffective back in the day, but the owner assured me that it would be WAY more expensive if it did.  So that's when I started drumming my fingers with an evil grin, a la Monty:
I could MAKE the writing!  Yes.  Except I didn't really want to, because I'm lazy.  So I came home, looked up images of fun apothecary labels, and printed out a few.


I was inspired by these jars
So I started cutting them and sticking them on, but none of them looked perfect to me.


Mind you, they didn't look bad, and actually now that I'm looking at them again I might like some of them better, but at the time, I hated them all and wanted nothing to do with them.  I'm fickle like that.  I actually threw them in the air in a fit of rage.  But so, there is nothing like failure to motivate a person, so I decided to make my own.

I found a thin sharpie, because paint wasn't gonna happen.  I decided to model it after the third one down in style.  I figured this would go in the bathroom to hold cotton balls and the like, and I wanted it to have a fresh feeling, so I decided to write "Tinct. Mentha Piperita," but there is a whole slew of delightful essences and ointments one can choose from if you so desire.  The writing part is a bit hard, but keep in mind that imperfections help make it look authentic.  I actually tried to make the spacing a bit different and some lines thicker than others.
My first go at it, I bunged it up and wrote TINT.  Then I was like, no worries, this will come off.  And then it DIDN'T come off and I freaked out, and then I tried nail polish remover and it worked.  When in doubt, always try nail polish remover, that stuff will eat through anything.
So this was my first pass at it.  What is that in the bottom corner, you say?  Why, it is old-timey apothecary measurements!

You can find the website here.
You can use drams or scruples or whatever sounds weirdest/looks coolest.  Mine actually is "A scruple thus," and I have no idea what that means, but (so sorry) frankly my dear, I don't give a dram. (So so sorry, I had to, you see?)

After the first pass, I went over it again with the pen to make it look a solid black, and once that dried, I did what I always do, which is do my best to ruin it.  In this case, I wanted it to match the chipped, faded gold rim, so I took a paper towel, dipped it in nail polish remover, and kind of dapped and swiped at it, especially around the writing that I had bunged up (the piperita part).  I found it worked best to lightly wet it and then chip at it with my nail.  After that, I went around everything with a q-tip to get the smudges off,  I wanted you chipped, not smeared, goddam you.  But really, my goal was to make it look worn with time and use.  It came out pretty well, but still has a few smears I can't reach that will haunt my dreams.

Les voila.
After that, it is just a coat of sealant and we are done!  Not perfect, but I much prefer it to the blank jar, and it will look perfectly lovely displaying my tampons. 

Friday, April 19, 2013

Man these fairies are difficult


My pride and joy.

As you know from this post, I am venturing into the world of fairy houses.  Since this is my first time, I have been experimenting with some ideas and failing at quite a few of them, which has been incredibly frustrating. I've found that it helps if I envision a pissed off little fairy bossing me around, at which point I obviously sass back, and this turns into a full blown confrontation and the only benefactor of this is my cat, who no longer has to deal with me yammering away at him all day.

Anyhoo, progress is moving along on the fairy houses, and I no longer feel like throwing them at the wall.  Not to brag or anything, but I think the boy fairy house (above) is looking somewhat decent.  Last I checked in, the house was a cream colored mess and kinda lumpy.  I decided to smooth over some bumps and add texture with some papier mache:
I kinda mashed it around with my finger to make it look like tree bark, and to my shock and wonder, this actually kinda worked.
Then I needed to stain it to look like wood, and I decided on a nice caramel color to contrast with the darker wood door and window frames, which was a terrible idea, because the entire house looked like ass.
Here's where I wanted to throw it at the wall.
But then I found a darker mahogany stain, and I swear I hear birds chirping when I took my first stroke because it was so damn perfect.  I was also outside, which could be the cause for the chirping, but I still refuse to believe that I'm not secretly Snow White.  From there I sealed it and made a cone-shaped moss ceiling for the main house and turret and forgot to take pictures of the process, and it is so frickin adorable that later on, when the zombies come and everyone is so depressed about everything, I'll reminisce about my very successful fairy house and people will be like, dude, you're supposed to be patrolling the campground and I'll be like, this is not a task I'm suited for, how about if I make you a fairy house?  And then they will be like, get out, and I will get cast into the dangerous outdoors where I am promptly devoured by bears, because they get just as hungry as zombies.

Here are some more of the pics - I just need to decorate the inside (possibly a chimney in the works?) and add some more moss to hang down over the side:

OK, in real life and up close, it really does look like tree bark, but in these picture it doesn't.
And now for my little niece house. It...is not turning out how I envisioned, but all is not lost.  I made one section of it, and decided to embellish it with some clay:


One quick bake, another layer of papier mache, some ombre paint to match the lilies, and then a quick addition of some interior vines:
It kinda looks like a weird Greenman face, which I didn't intend, but I kinda dig it.
Oh, did I mention I made a fairy bed?  I made a fairy bed out of a seashell, floral wire, feathers and an old earring for the headboard and I want a human sized one.
The problem is, I had planned on something a little more intricate, so I made another little hut with a proper door and window, but now I am a bit at a loss for how to arrange them because I am a little bit OCD about arranging in threes, and also I am trying to establish a purpose for the rooms, and also I don't wanna make another because what is it used for?  Her hookah lounge?
Clearly not finished.
My idea is that the main house will be where the fairy cooks, and the Greenman hut is where she sleeps, and maybe putting the main house up on a riser and creating a spiral staircase out of seashells but is that crazy?  It seems crazy.  Like, if you are a little kid, are you like, this fairy is certainly high maintenance.  I don't know, I need to think about it.

On a side note, during this post, I had run out of wine (I had a stressful day, ok?), and I just looked over and it had refilled, so either I had refilled my wine on autopilot whilst thinking about Greenman, who is awesome, or the fairy is trying to make nice with me to get me to build her a hookah lounge.  Well played, fairy, alcoholic bribes are definitely the way to go.

Monday, April 15, 2013

Fairy Houses!!

The fairy door that mysteriously appeared in Golden Gate Park, which has now mysteriously disappeared because the fairy was receiving too much attention and had to move.  Or because some a**hole methhead took it and will be burning in hellfire for all of eternity.
A few weeks ago, I was talking to my lovely sister-in-law about possibly switching my focus over from mobiles to building fairy houses, because let's be honest, fairies are the best, and I would prefer to live the majority of my life suspended in a reality where fairies do exist but will settle for living vicariously through the innocent eyes of an excited young'in.  At that point, it was still in the "I've had a few drinks this is a great idea" phase, but being the ever-supportive sister she is, she promptly commissioned me to make one for my niece and nephew, which is fantastic, but also prompted an "oh crap, I need to learn how to make a fairy house right now" freakout.

I have been brainstorming for awhile, and testing out some ideas, so I figured I would show the process here, and also because my SIL is probably wondering what the f&%* is taking so long.  For my hippie, lovable niece, I thought I would do something involving lilies as a roof, and for my super-smart nephew, something a bit more masculine with branches and moss.

Here is the progress of the flower child house.  I could swear I took some photos of the in progress, but that's why your mother said swearing is wrong, because I didn't.  But basically I made a papier mache house with two windows and a door, and will be adding some vines and other accents, and maybe work on a few other towers to accompany it possibly?

This doesn't look good yet, but it will.  Oh, it will.

And for my nephew, I decided to make the entrance and windows out of branches, and I had the idea to make the entire structure out of branches and clay and would cover the clay with a moss roof and oh my God not a good idea.

Looks promising, right?
Errr...maybe if I just adjust...
Nope.  This is awful and quite possibly the worst thing I have ever done.
So, after that disaster, I decided that fairies would probably not like a branch home anyways because of the drafts.  I kept the idea of wood door and windows and built around it with thick paper and clay.
Fairy window and paper walls
It's a bit of an odd shape, I will admit, but I built up the clay around the bottom to try to make it look a bit more less weird.
Fairy door.
And the pièce de résistance, a tower à la Dumbledore's office.  
Complete with window for a miniature Fawkes.
I baked it, and will be layering papier mache over it to create a more natural texture, then possibly staining it to match the wood.  Still not decided on this as I kinda like the ivory color but I think it would be for the best.  Stay tuned, I will be posting updates as I continue work on these bad boys.


Wednesday, February 13, 2013

DIY Nautical Ship Lamp

Ah, the joys of food poisoning.  Last night I awoke at 3 am to spend the next few hours vomiting in a 50 degree bathroom.  Anyways, the point of this isn't to whine, it's to explain that if perfect coherence isn't achieved in this post, it would be advisable to hold off on complaining until I'm in a better mood.
A picture I took of Portland Head Lighthouse in Maine, AKA my dream home.
Anyhow, this post revolves around one of my great loves - anything nautical.  I would kill to live on the ocean or a boat. I don't even have high expectations, a crappy boat is fine, just as long as I get to hear some obnoxious seagulls as I do the dishes, but alas, that isn't in my immediate future.  To compensate for this, I obsess over all nautical decor so I can trick myself into thinking I live on the beach.

A recent trend in the last few years is nautical tripod lamp, which has seen quite a few variations, but all are similar in the fact that they are out of my budget:


So began my mission to create a nautical inspired tripod lamp.  The first step was to get myself a tripod.  I scored myself a not-too-sturdy tripod for $35 on ebay that had a great vintage look to it.  These can be quite expensive if you buy new, but if you take your time and scour ebay, craigslist, and some thrift stores, you can luck out with a deal on an old vintage wood tripod.  Mine is sequestered by a door we don't use, so the ricketyness isn't a problem, but if you have kids running around or it will be in a high-traffic area, I would definitely make sure it is a bit more sturdy.  Just make sure it will expand out to the height you want, and also take a good look at the head of the tripod, or the bit at the top.  Some are flat, which would be optimal.  Mine unfortunately looks like this, but I made it work with the lantern I had:


I love the red and white stripe of an antique surveyors tripod, but wanted to make it look a little bit aged, so I purposely chose a plain wood one so I could paint it and distress it myself, however, I saw a few that came already striped.  I unfortunately forgot to take a before picture, but here you can see it with just the top section painted red, along with the giant mess I created:

Scotch tape made it easy to measure out and make straight lines, and also to protect the areas that I didn't want paint on.

To get a distressed finish, I used a gnarled, bristley brunch and lightly brushed on the paint, then dabbed at it with a towel to achieve a slightly uneven appearance.  For the brass sections that I painted over, I also sanded it in some sections after drying.  If I had to redo, I would sand the entire brass section before painting to give it a matte appearance.  Apologies for the terrible pictures:

Once it looks as aged as a rotted barrel, you're good to go.

The tripod was finished, and next came the tast of finding a good light to attach to the head.  Ebay and some antique stores sell a number of nautical spotlights/searchlights/lanterns that would look amazing perched on top, but they can also be quite pricey.  The searchlight look (like the black one above)  is quite popular, and you can occasionally spot one for around $30-40, but the trick it finding a way to light those up, so I went in a different direction.  For me, the perfect fix was a lantern I already had in my house that I had picked up for a whopping $2 at a garage sale.


I took out the oil well and wick to get it to fit over the thingamabob on top of the tripod, and also because oil well+fire+rickety tripod=a not brilliant idea that I probably wouldn't have thought twice about 4 years ago.  
Alas, you haven't found one of these gems at a garage sale?  If you are anywhere near a beach, usually the souvenir stores will sell replicas for around $10 - 15, or you can find some options online:
If you're willing to spend more, this bad boy will plug in and looks awesome.  In fact, it is now on my list.
This guy will give off a warm glow and is on sale for $27
Rusty over here would give it a cool look, and you can find this style in red too.
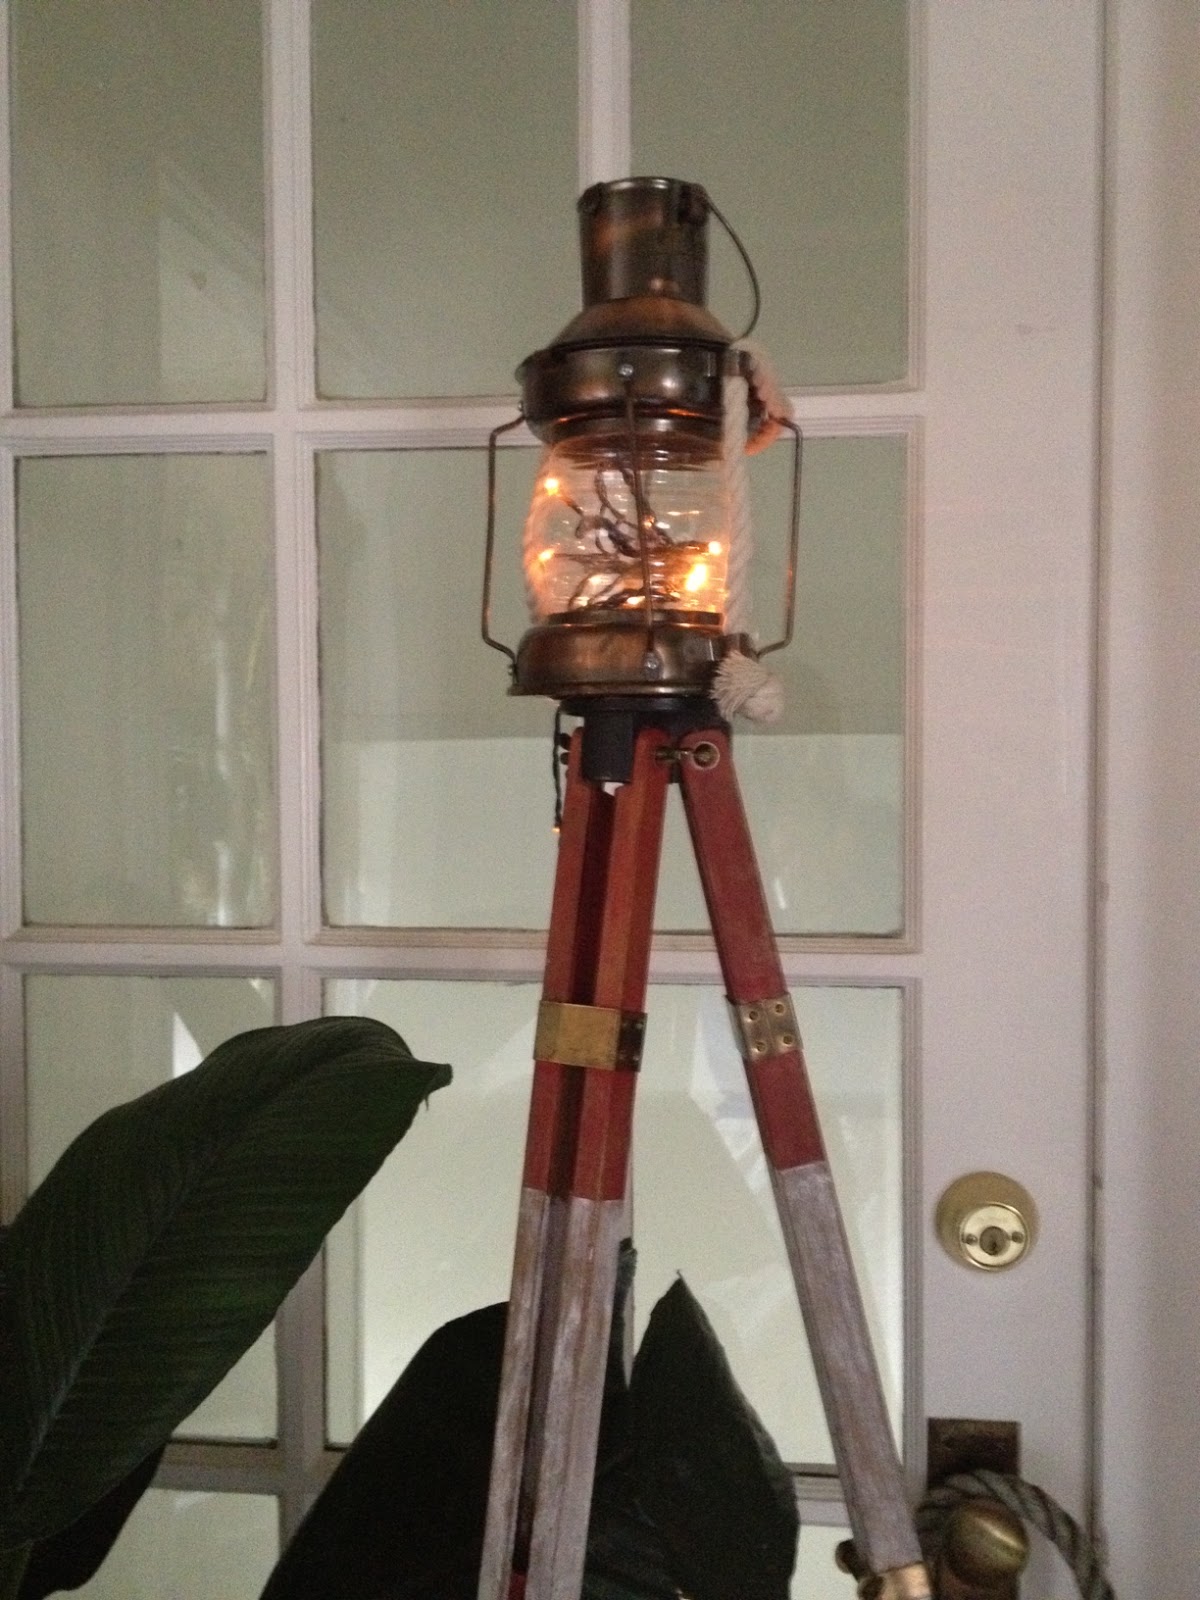
Electric would certainly be easier and way more useful than the way I have it, but you really have to keep your eyes out for a good price, especially if you would prefer a genuine antique, which I ultimately want.  But here we are, and all this nautical lantern browsing has given me the shopping addiction shakes, so let's move on.  I decided that it would be easiest to stick in some battery operated string lights that have a timer and be done with it:
I thought I would hate it but it turns out that I totally love it like this.  It certainly doesn't light up the room, but is a great nightlight and gives it a really warm glow.  However, you could also use a battery tealight (they have them now with timers) or if you aren't prone to electrocution like this blogger, you could try to wire something in.  OK, nevermind don't do that, I just found this which would make it so easy and I might buy that now.  Here are some pictures of it all set up and styled with some old floats I found at a seaside antique store.  Feel free to comment if you have any other ideas for lighting it up, I love to hear from fellow nautical lovers!